Email.
Get support for your Esendex Email products.
Managing your contact lists
Before you start
The foundation of successful campaigns begins with the right list of contacts. Before you create your first list, please take a few minutes to review the following:
Esendex is a permission-based service.
This means no 3rd party lists, no web-scraping, no borrowing or using outside lists. Ever. Want to learn more? Just read our Acceptable Use Policy.
All subscribers need to opt-in into your lists.
A double opt-in is the only way to make sure that your subscribers really want to receive emails from you. The process is simple: subscribers register on your website, using your own form or our subscription form, and immediately get an email asking them to confirm their subscription. That way, you are sure that your subscribers actually registered with their own address.
Keep lists updated and active.
Permissions can go stale after a few months and sending to an old inactive list may cause spam complaints. Clean your lists regularly to keep only active and engaged subscribers.
Remove role addresses.
Role addresses are usually group based and not used for marketing emails.
Plan your Custom Contact Properties.
If you will be importing contact information (first name, city,…) to send personalised emails, take a moment to create your contact properties.
Contact List Management
Create your lists, import your contact information, define custom values… You will learn everything you need to know to easily manage your recipient lists.
Create a Contact List
From the menu, select Contacts → Contact Lists.
Then click on the ‘Create a contact list’ button.
Enter a contact list name.
You have several choices on how to populate the contact list:
- Upload a file in CSV, TXT, or RTF format.
- Manually paste your subscriber information.
- Create an empty list.
If you have a significant amount of contacts, we recommend uploading them via a file. (If you are uploading a CSV file, please check that the information is formatted correctly.)
For this example, we will manually add the contact information by clicking ‘Insert Manually‘.
Match each of your contact properties by selecting a contact property or create a new one.
If you import a date field, you will be prompted to select a date format. (Learn more about Supported Date Formats.)
Then click ‘Continue’.
The last step is to read and accept the sending policy by checking ‘I certify that’ and then click ‘Create list’.
Change your Contact List Name
Click on the cogwheel icon on the right and select ‘Rename‘. Make the changes and then click ‘Rename‘ again.
Duplicate a Contact List
Click on the cogwheel icon, then select ‘Duplicate‘. Your new duplicated list will appear right under the original one, with the prefix of (1).
Delete a Contact List
Click on the cogwheel icon and select ‘Delete‘. Then confirm the deletion of that contact list.
Export/Download a Contact List
The simplest way to export your contact list: Click on the contact list name from the Contacts page. Click on the ‘Export list’ button on the right side to export your list to a CSV or Tab Delimited file.
Please note: once a contact list is deleted, it cannot be recovered.
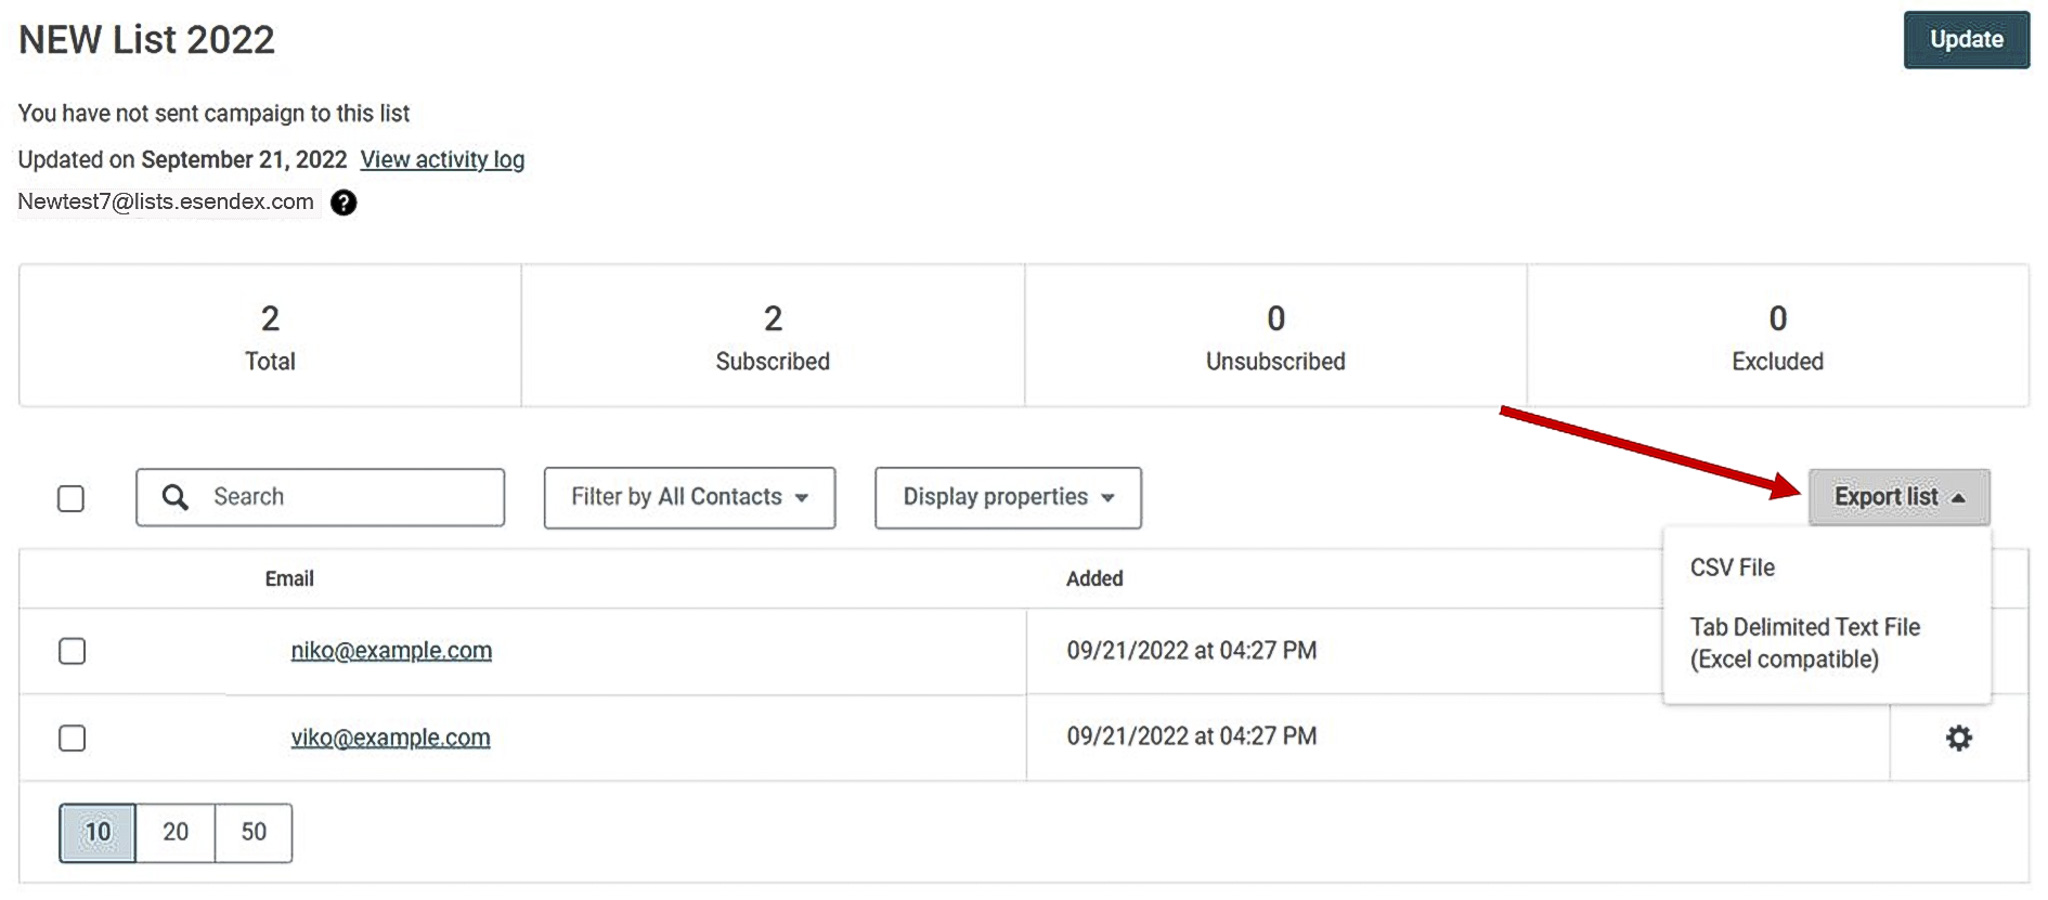
Note: If you want to download your contact list along with the associated properties, start by selecting the properties you wish to include in the export from the “Display properties” dropdown menu.
Once you’ve made your selections, simply click on the ‘Export list’ button located on the right side to export your list to either a CSV or Tab Delimited file.
Subscriber Management
Esendex provides a set of tools that will help you manage your contacts, especially the unsubscribed ones. In fact, people unsubscribing from your newsletter should be immediately removed from your contact list. Receiving a spam complaint from a recipient who received an unwanted email is not good.
Simply put: you should focus on sending messages to the people who really want them.
Add new contacts to a list
From the Contacts page, click on the cogwheel icon and select ‘Edit contacts‘.
On the new page:
• Select ‘Add new, update existing contacts (don’t resubscribe)‘
• Paste in the new contact information or upload via a file (CSV, XLS, or TXT)
• Match any contact properties
• Check the ‘I certify that:’ checkbox
• Click the ‘Edit List’ button
Remove/Unsubscribe contacts from a list
There are several ways to remove contacts from your lists. For each of the following examples, you can choose to completely remove the contact from the list, or simply unsubscribe them (keep them on the list but with no sending).
When you unsubscribe a contact from a specific mailing list, it only removes it from that particular list. If you want to unsubscribe the contact from all lists, you’ll need to add it to the exclusion list. This ensures the contact won’t receive emails from your campaign sending’s but will still receive all your transactional emails.
One contact from many lists
From the All contacts page, enter the email address in the search bar and then click on it.
From the contact’s details page, select a list name, click on the cogwheel icon and choose ‘Remove from list’ or ‘Unsubscribe’.
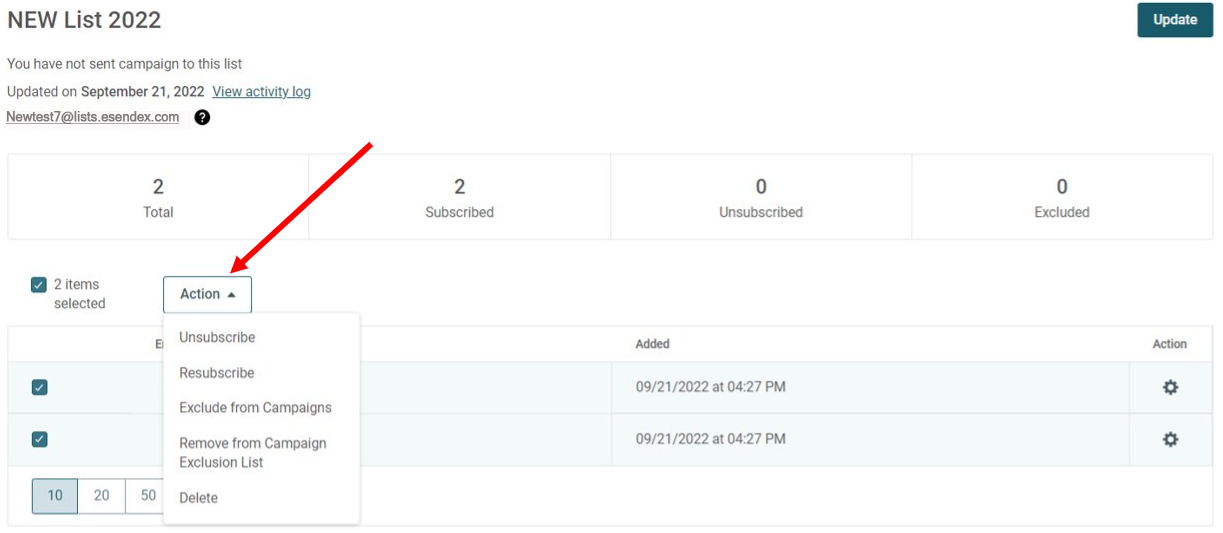
One or more contacts from a list
The easiest way is to open the list directly and select the addresses you want to remove. Then click on the ‘Action‘ button in the toolbar, and choose ‘Delete‘ or ‘Unsubscribe‘.
Many contacts from one list (via a file upload)
Similar to adding contacts via a file, you can also remove or unsubscribe contacts via a file import. Your file must be a CSV, XLS or TXT file, and only the email addresses are needed.
From the Contacts Page, click on the cogwheel icon and choose ‘Edit contacts’ for the desired list name.
On the new page:
• Click the desired action (‘Unsubscribe Contacts’ or ‘Remove Contacts’)
• Paste in the new contact information or upload via a file (CSV, XLS, or TXT)
• Check the ‘I certify that:’ checkbox
• Click the ‘Edit List’ button
Correct/Edit an email address
You can’t edit an email address once it’s been uploaded to a contact list. Technically a mistyped email address is still an email address but perhaps one that does not exist and could result in a bounce. The best thing to do is remove it from the contact list.
Contact Properties
You can store details about your subscribers that were provided to you during the sign-up process such as a name, age, or location. This subscriber information can be stored in Contact Properties.
A Contact Property consists of:
- Name (an internal label)
- Data Type (string, integer, decimal, boolean)
You can create as many contact properties as needed, and you can choose which contact lists use which properties.
To learn how to create, edit and delete contact properties, please read our FAQ.
Edit a Subscriber’s Contact Property Value
You can edit the subscriber’s contact property values from their details page.
(To find a subscriber’s details page, go to Contacts → All Contacts and search by their email address.)
Click on the ‘Contact Properties‘ tab to view all the current properties. Then click ‘Edit’ to make the changes.
If you need to update property values for multiple subscribers in the same contact list, you can update your contact list by selecting the ‘Add new and update existing contacts (don’t resubscribe)’ and upload a file with the new contact property values.
Managing Unsubscribes
An unsubscribe link must be added to each email sent, unless it is a transactional message (account validation, an order confirmation, etc). In fact, it’s the law in most countries. Also your subscribers may mark your emails as SPAM if they cannot find a working unsubscribe link.
When sending a marketing email (campaign), Esendex will help you to integrate the unsubscribe link:
- With the Esendex Email Editor, the unsubscribe link will be added automatically. No work needed here by you 🙂
- If the HTML Import Feature is used, you just need to paste the unsub-tags provided and Esendex will do the rest.
- For SMTP sending, the unsub-tags provided by Esendex can also be used and will automatically be replaced by unsubscribe links. Please note: the List Email address must be used when sending with SMTP (please see below).
Of course, if you already have a working system that manages your contacts, you are are free to use your unsubscribe system. Just be aware that the newsletter builder will always add an unsubscribe link.
How unsubscribes are handled
- When using the Email Editor, or the HTML Import Feature, when a recipient unsubscribes from your newsletter, they will be automatically unsubscribed from that one contact list only.
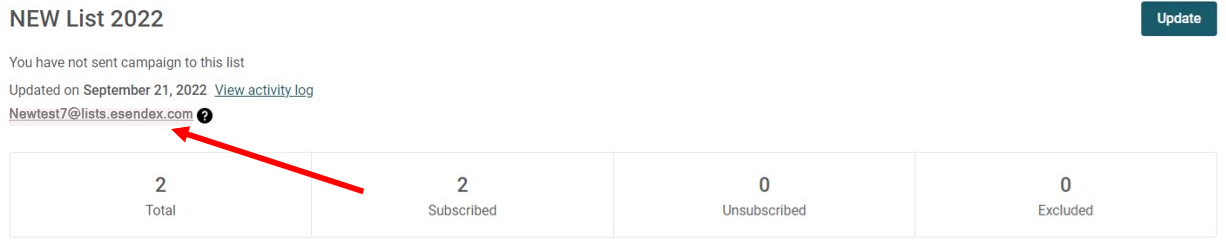
- With SMTP, for unsubscribes to be automatically handled by Esendex, you can send to the List Email Address (also known as ‘Magic List’ Feature). The List Email address can be found on the details page of any contact list. Simply use the List Email address in the ‘to’ field when you are sending your newsletter.
Managing Bounced and Blocked Emails
How Esendex handles Bounced and Blocked Emails
Esendex will automatically take into account the critical statuses from previous sendings:
- Hard Bounced emails: This is a permanent delivery error caused by an invalid email address (e.g. a mistyped email, a non-existent destination server). Hard bounces negatively impact your sender reputations and are automatically blocked by Esendex.
- An email address labelled as “Spam” will also be systematically blocked.
Please note: it is recommended that you remove these email addresses from your contact lists on a regular basis to avoid deliverability issues.
Removing Bounced or Blocked Contacts from a List
Removing all bounced or blocked contacts (or any other status) from a contact list is quite simple:
Go to the results page for your campaign and select ‘Non-delivery‘ status.
Click the ‘Manage contacts’ button. In the new section that appears, select the desired contact list and the ‘Remove from a list’ action. Click ‘Remove contacts’ and you are all done!
Recommended articles
Can't find what you're looking for?
Speak to a member of our support team.