Email.
Get support for your Esendex Email products.
How do I warm up my IP ?
Build and protect your reputation from the start
It’s important to remember that as you’re getting started with Esendex, now is the best time to start off on the right foot. Your domains and IPs might need to be warmed up before you start sending your full volume, and much of this depends on your overall send volume and email program.
For example, sending from a shared IP means that you don’t need to start an IP warm-up, but it also means that other senders on that same IP can affect your sending. This option best fits senders that do not send enough email to justify the extra cost of a dedicated IP.
Dedicated IPs, on the other hand, are a brand new IP. ISPs therefore have never received emails from it and all emails sent from an unknown IP address are initially suspicious. Dedicated IPs need to be warmed up before they can be used. This requires a cushion of time ahead of your sending to slowly ramp up messages being sent from that IP to show inbox service providers (ISPs) that your traffic is legitimate, and not a spammer posing as your business.
The warm-up plan allows the sender to introduce themselves to the ISP and to start building a positive sender reputation that the ISPs are comfortable with before sending a lot of volume.
The IP warm-up period is crucial to creating a strong sender reputation from the outset of your sending. During this period, ISPs and mailbox providers will be closely analysing your sending volume and frequency.
By starting small and progressively increasing the volume of emails sent during your IP warm-up period, you are giving ISPs and mailbox providers a chance to review your content and measure the reaction that your recipients have to your emails. It is essential to use a warm-up period to ensure your emails have the best chance of reaching the inbox.
It is important to only send emails to recipients who truly find value in the content you offer. Targeting users who never signed up or who have lost interest in what you send can negatively affect your ability to reach the inbox. This is true both during the IP warm-up period and after it ends. Your users will indicate their interest in your emails by taking actions like signing up for your mailing list or registering an open and/or a click.
How to warm up your dedicated IPs
The following section walks you through a step-by-step process for warming up your dedicated IP. Follow these six steps to ensure that you get off to a great start.
1. Check domain quality
It is essential that your sending domain has a healthy reputation and is not blacklisted on any third-party blacklists. We strongly recommend you use the Google Postmaster Tools to get more information about the reputation of your domain at Gmail.
This has to be done by you, the owner of the domain. You can register at the following link: https://postmaster.google.com/?pli=1
In addition, you should not use a recently purchased domain. If you have recently purchased your domain, it should be active for at least the last 30 days. Webmails and ISPs associate recently purchased domains with spammers. A common practice among bad actors is to ruin the reputation of a domain, and then purchase a new one and start again.
Finally, your domain and/or subdomain must be attached to an existing website. If you use a subdomain, a redirect must be used.
Since your dedicated IP has not been used yet, we recommend making yourself known to the various email clients in conjunction with your domain – this is best done strategically by warming up your IP slowly.
This means that you increase the volume of email sent via IP address step by step. This phase is also called an IP warm-up.
2. Set increase rate
As mentioned above, dedicated IPs (and therefore warm-up plans) are recommended for a minimum of 100,000 emails per month.
Regardless of your email volume (starting at 100,000 emails and higher per month), always start with 300 emails on day one and keep a daily increase of 20% of your sending volume. Depending on the case, a lower or even higher increase rate may make sense:
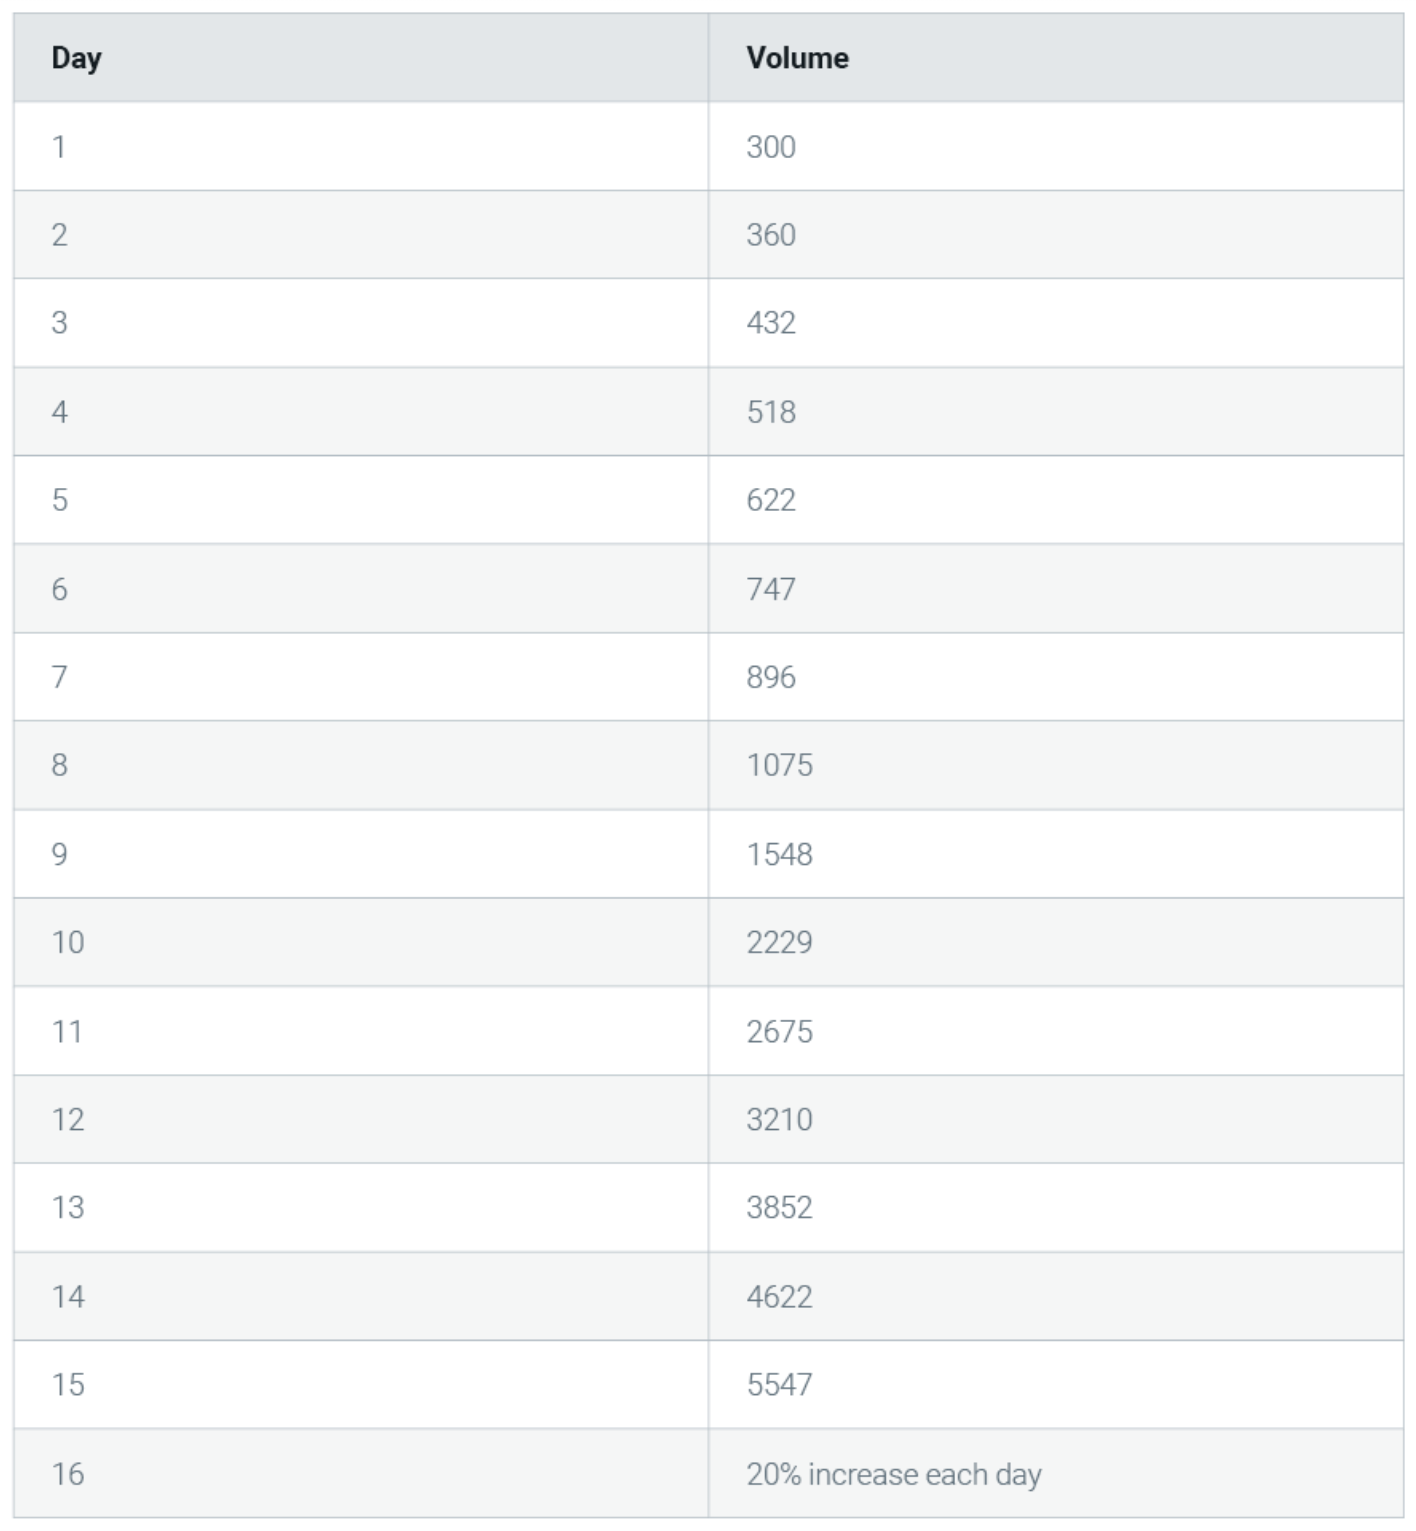
Note: This schedule can vary based on many factors like reputation, list hygiene, and user engagement. Do you need to ramp up more quickly to meet a deadline? It’s possible to follow a more aggressive warm-up plan and not damage your reputation, but this is only recommended with the help of an email expert.
When it comes to the rest of your emails, you can usually send them via your old email marketing provider, but that depends on your sending practices.
After all, you can’t stop sending them completely. This is especially true for transactional emails.
3. Make sure you have a regular email dispatch
In addition to the increase rate, the sending frequency is another success criterion for an IP warm-up.
Ideally, you should send messages daily. This will help ISPs classify you as a good sender more quickly. It is also easier to determine the increase in sending volume when you send daily.
However, if you only send three times or less per week, this is not a problem in principle. In this case, the email clients need a little longer to take the time to better assess you and your email intentions.
4. Pay attention to interaction of your recipients
Email providers such as Gmail or Yahoo look heavily at engagement when rating IPs.
Therefore, when warming up a new IP address, you should send to your most active users. This way, you ensure that your complaint rate (spam, blocks, etc.) stays low.
5. Clean your email lists regularly
Especially in the warm-up phase of your new IP address, you should take an even closer look at the quality of your email contact lists. Here are some best practices to help you:
Remove inactive and unreachable recipients as well as blocks
Remove inactive as well as unreachable recipients. Based on your bounce rate in your campaign stats, you can see if you are contacting the right people.
Another factor that ISPs monitor is the number of complaints your emails generate. Nowadays, a lot of people find it easier to report unwanted messages as spam than to simply unsubscribe to them.
After every campaign you send, remove the following from your list:
- Soft and hard bounces
- Spam marks
- Blockings
ISPs track the number of bounces you have with each sending event and take them into account when determining your reputation. If you generate too many bounces, these ISPs may block your messages.
A soft bounce is a temporary deliverability issue such as a full inbox or server problem. It is okay to continue trying to send email to these addresses, as it is possible that they will get through on the second or third try. But make sure you remove the contact from your contact list after multiple soft bounces.
This depends on the frequency with which you contact the recipient. If a contact, for example, soft bounces five times within a six-month period, it is likely that it will soft bounce in the future.
A hard bounce is a persistent deliverability problem, such as an invalid email address. Since there is no chance here that the email will ever be received, it is important to remove these addresses immediately.
Check out our overview on all email statuses in our documentation.
We also recommend that you remove recipients who have not opened your last five emails by cleaning your lists regularly.
If you plan to reclaim inactive contacts, wait until after the IP warm-up period. Otherwise, you risk lower interaction rates.
Check email addresses for typos
Check your lists for typos, too. A simple data check to correct typos and typos entered during the acquisition phase is the first step to a clean list.
This way you can clean up simple errors like tom@alo.com, tara@gmail.com, terry! Yahoo.com, etc., and you won’t send messages to invalid contacts.
Remove non-personal email addresses
Remove all more general email addresses such as company@unternehmen.de and system email addresses such as postmaster@company.de and noreply@company.de.
Note: In general, it is essential to collect contact data using an opt-in registration form, or even better a double opt-in form. The purchase or rental of contact lists is prohibited at Esendex and using them will lead to the termination of your account.
Watch out for email content best practices
Webmail and ISPs also analyse the content of your email when deciding if it should land in the inbox, promotions, or spam folders.
We’ve provided a list of recommendations on best practices regarding your content.
Text/image ratio:
- Reduce the text-to-image ratio to about 70%/30%: some spammers use excessive images to hide content or text.
- Separate images with text.
- Avoid the use of overly large images.
Content:
- Reduce or delete characters such as «%»; «!»; «?»; «$», and reduce or delete text in ALL CAPS.
- Reduce or remove words and categories of words identified and analysed as being associated with unwanted emails. These include:
“Cash”, “Invoice”, “Billing”
“Promotion”, “Special offer”, “Free of charge” – “PayPal”, “Visa”, “Mastercard”
“Urgent”, “Desperate”, “Help me” - Avoid using base64 encoding – it’s considered by some anti-spam engines as an attempt to hide content. We recommend using the “quoted-printable” encoding (which is currently used by our own drag & drop editor).
6. Carry out regular reputation checks
Regular measurements of success in the IP effort phase should not be underestimated. In addition to campaign performance and list clean-up, a review of reputation development is recommended.
This will help you find out if you can successfully complete the IP warm-up process.
Check your Sender Reputation on a regular basis. As mentioned above, you can make use of Google Postmaster Tools.
Again, as a reminder: When sending emails from a new IP address, it is important to start with a low email volume and gradually increase. This is the best way to build a sender reputation with the new IP address.
But what exactly does low email volume mean, and how should you increase sending? In short, how long does it take to warm up an IP address?
You can build a positive sender reputation in as little as two to four weeks. But it can take six weeks or longer to reach your usual sending volume on the new IP address.
The time required to warm up an IP address depends on your:
- Email client: Each email client has its own rating patterns. Therefore, it may take different amounts of time for you to build up a good sender reputation with all clients.
- Planned email sending volume: The more emails you plan to send, the longer the IP warm up period will be.
- Sending frequency: The more frequently you send high-quality emails (i.e. not spam) , the faster you will be able to warm up your new IP address.
If you are interested in an individual IP address warm-up plan and you want to find out more, feel free to contact our Sales Team.
Recommended articles
Can't find what you're looking for?
Speak to a member of our support team.