Email to SMS.
Get support for your Esendex Email to SMS products.
Additional Security Settings – Email to SMS
As Email to SMS was created to help users quickly set up their accounts and start sending right away, once you add an email address to the list of users, any message sent from it will be accepted by our system wherever the user might be.
As we’re ISO certified, we take security seriously. So, once you’ve successfully tested sending a message, we advise you configure some additional security settings.
The security settings which you can configure through our system only allow authorised email addressed with an authorised IP to send to an email from your account. Any email that Email to SMS receives coming from an unauthorised IP will be rejected, even if the email is recognised.
To do this, you need to either add your mail server IP address(es) to the whitelist, or create an SPF record for your email domain.
Add your mail server IP address(es) to the whitelist
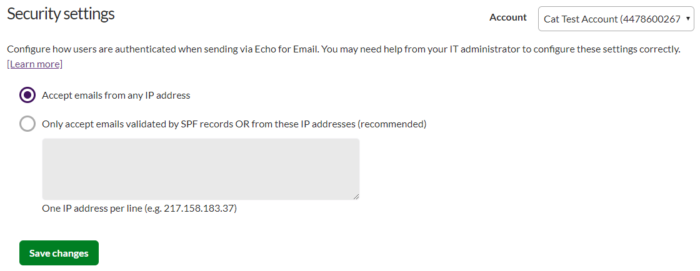
Setting your IP address to the whitelist is easy. Click into Email to SMS, then ‘Settings’ and select ‘Security’.

You need to tick the second option, and then in the text field provided, type in all IP addresses you would like to enable.
Create an SPF record for your email domain
If you have a large number of email servers, add email servers regularly or use a hosted email service then creating an SPF record for your email domain may work better for you.
An SPF record is used to show other mail servers, which server(s) or IP address(es) are being used to send an email for a domain. These other mail servers (including the Email to SMS servers) are then able to reject emails that are sent from other locations.
When Email to SMS receives your email, it will look for an SPF record on your email domain’s DNS and then any email that reaches us which is from an IP not on your SPF record will be rejected.
There are various options for what your SPF record can be and therefore we recommend that you contact your IT department, or hosting provider to create the SPF record for your email domain.
Once you have added your SPF record to your DNS you will need to enable the advanced security options. To do this, click into Email to SMS, then ‘Settings’ and select ‘Security’.
You then need to select the second tick option, but you will not need to enter anything into the text field.
Depending on your email client the setting of the SPF Record might be different. You can check the one for Google below as example:
If you need more details please, contact support to receive help.
Recommended articles
Can't find what you're looking for?
Speak to a member of our support team.